Island Getaway charm necklace
My favorite necklace I have ever made so far is this one...
I wanted to keep it, because it had turned out so great!
I might just have to make one for myself someday...


I wanted to keep it, because it had turned out so great!
I might just have to make one for myself someday...

Very very simple to explain, and very very simple to make. It just took me such a long time because I wanted to be just right.
You can see for yourself how to do it, but I'll explain it anyway (because it's just silly to post a picture on a blog and not say anything about it!)
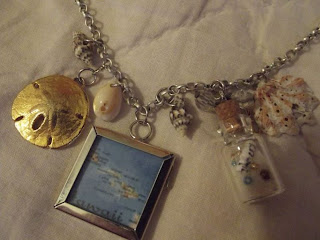
Okay, after much trial and error, I managed to add a small seashell as the first charm. Then I attached a sand dollar charm onto the chain.
Next came another small shell and then the map charm...
(I had to get Dad's help on this one...) He found a picture of the Hawaiian Islands and shrank it to a tiny size and printed the words below. I cut out the itty bitty picture and put it inside a small jewelry frame (You can get those at Walmart- for very cheap)
Next, I out on another evil shell (those things took forever to put on! They were either constantly breaking into a million pieces, or slipping off the jump rings!)
Then, the message in a bottle charm.
Here's how I did it:

You can buy these itty bitty bottles at Hobby Lobby (or any craft store, I'm sure.) I filled it with sand with blue and gold seed beads (only a few.) I rolled up a small piece of paper, taped it in place, and dropped it into the bottle. Next, I attached an mini anchor and jewel charm onto the top. Then I attached the whole thing to the chain.
And lastly, I added one last shell, slightly bigger than the others. This was a shell I owned. It already had natural holes at the top. So I just strung a ring through it and...
TA DA!
All finished!
It took me about over an hour to make!

Thanks for reading!

Comments
Post a Comment